


 How to resolve AdBlock issue?
 - Posts: 2181
- Thank you received: 1685
×
Bugs: Recent Topics Paging, Uploading Images & Preview (11 Dec 2020)
Recent Topics paging, uploading images and preview bugs require a patch which has not yet been released.
×
Painting Minis, Print & Play and Other Creative Type Stuff.
My Twilight Imperium board
- Disgustipater
-
 Topic Author
- Offline
- D8
-

- Dapper Deep One
Less
More
08 Jul 2015 22:27 - 08 Jul 2015 22:35 #205774
by Disgustipater
My Twilight Imperium board was created by Disgustipater
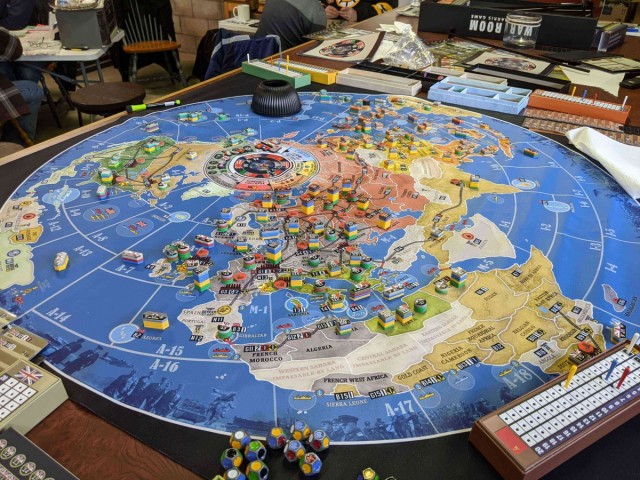
I wanted to have a way to confine the tiles for my Twilight Imperium games, and not content with a simple frame (and because we sometimes need to push two tables together), I decided to make a full board:
[click pictures for larger versions]

It has a score track, a space for the Wormhole Nexus, as well as trays for the fighter, ground force, and trade good tokens.

There are a few noticeable empty spaces, but I just put various card decks in those areas to fill the space.
I drafted up the design in AutoCAD, printed out a template/stencil to transfer to the 1/4" birch plywood, then used a router and utility knife to cut out the recesses. My router work in the large tile area isn't too pretty, but you barely see it when playing, so I don't care.


My first attempt at the score track was to cut a stencil out of paper and trying to paint it on with white paint. It looked like garbage from all the paint bleeding under the stencil. So I had to sand it down, re-paint it black, add the stars, then go for round 2. I cut the stencil out of clear contact paper. Stuck it down, painted a single pass of black paint at all the edges to fill in any holes between the stencil and board (to prevent bleed), then gave it a light dusting of silver spray paint. For how much of a hassle it was, it turned out damn near perfect.

[click pictures for larger versions]
It has a score track, a space for the Wormhole Nexus, as well as trays for the fighter, ground force, and trade good tokens.
There are a few noticeable empty spaces, but I just put various card decks in those areas to fill the space.
I drafted up the design in AutoCAD, printed out a template/stencil to transfer to the 1/4" birch plywood, then used a router and utility knife to cut out the recesses. My router work in the large tile area isn't too pretty, but you barely see it when playing, so I don't care.
My first attempt at the score track was to cut a stencil out of paper and trying to paint it on with white paint. It looked like garbage from all the paint bleeding under the stencil. So I had to sand it down, re-paint it black, add the stars, then go for round 2. I cut the stencil out of clear contact paper. Stuck it down, painted a single pass of black paint at all the edges to fill in any holes between the stencil and board (to prevent bleed), then gave it a light dusting of silver spray paint. For how much of a hassle it was, it turned out damn near perfect.
Last edit: 08 Jul 2015 22:35 by Disgustipater.
The following user(s) said Thank You: Ska_baron, 433, Dr. Mabuse, Hex Sinister, DeletedUser, Msample, Mr. White, Jackwraith, Columbob, OldHippy, Brewmiester, Camshaft, hotseatgames, engelstein, wadenels, sornars, scrumpyjack, airmarkus
Please Log in or Create an account to join the conversation.
08 Jul 2015 22:32 #205775
by Mr. White
Replied by Mr. White on topic My Twilight Imperium board
Front page this!!
Please Log in or Create an account to join the conversation.
08 Jul 2015 22:34 #205776
by Gary Sax
Replied by Gary Sax on topic My Twilight Imperium board
That's fucking awesome!
Please Log in or Create an account to join the conversation.
Less
More
- Posts: 116
- Thank you received: 88
09 Jul 2015 09:06 #205796
by scrumpyjack
Replied by scrumpyjack on topic My Twilight Imperium board
I would buy one in a heartbeat.
Please Log in or Create an account to join the conversation.
09 Jul 2015 09:30 #205800
by Ska_baron
Replied by Ska_baron on topic My Twilight Imperium board
That is a thing of beauty.
Please Log in or Create an account to join the conversation.
Less
More
- Posts: 305
- Thank you received: 92
09 Jul 2015 11:27 - 09 Jul 2015 11:30 #205841
by fastbilly1
Replied by fastbilly1 on topic My Twilight Imperium board
Excellent work. What router bit did you use? Did you ever think about doing it as two pieces (seems like it could be done easier with a scroll or jigsaw)?
Nice choice on the birch plywood though, it will last forever and is not stupidly heavy - like MDF.
Nice choice on the birch plywood though, it will last forever and is not stupidly heavy - like MDF.
Last edit: 09 Jul 2015 11:30 by fastbilly1.
Please Log in or Create an account to join the conversation.
09 Jul 2015 11:29 #205842
by airmarkus
Replied by airmarkus on topic My Twilight Imperium board
Bad ass and well done. I wish I had those skills.
Please Log in or Create an account to join the conversation.
- Michael Barnes
-

- Offline
- Mountebank
-

- HYPOCRITE
Less
More
- Posts: 16929
- Thank you received: 10375
09 Jul 2015 11:59 #205847
by Michael Barnes
Replied by Michael Barnes on topic My Twilight Imperium board
Damn, man.
Please Log in or Create an account to join the conversation.
- Disgustipater
-
Topic Author
- Offline
- D8
-
- Dapper Deep One
Less
More
- Posts: 2181
- Thank you received: 1685
09 Jul 2015 12:37 #205852
by Disgustipater
Replied by Disgustipater on topic My Twilight Imperium board
@airmarkus - It doesn't take much skill. I'm no professional; I was basically figuring this stuff out on the fly. I just really enjoy making stuff in general.
Just a 1/2" straight router bit I had laying around because I was too cheap to go buy a larger one to save myself a lot of trouble. Luckily I realized before starting that I needed to start from the center and spiral out so at least half of the router plate would still be touching the top surface.
That was my original plan, to use two pieces of 1/8", but they were bit warped and I was concerned about how flat it would lay once glued together. So I went with the single piece, which did warp a bit after I removed more than half the layers from the bulk of it, but it's minor enough to not be an issue.
fastbilly1 wrote: What router bit did you use?
Just a 1/2" straight router bit I had laying around because I was too cheap to go buy a larger one to save myself a lot of trouble. Luckily I realized before starting that I needed to start from the center and spiral out so at least half of the router plate would still be touching the top surface.
fastbilly1 wrote: Did you ever think about doing it as two pieces (seems like it could be done easier with a scroll or jigsaw)?
That was my original plan, to use two pieces of 1/8", but they were bit warped and I was concerned about how flat it would lay once glued together. So I went with the single piece, which did warp a bit after I removed more than half the layers from the bulk of it, but it's minor enough to not be an issue.
Please Log in or Create an account to join the conversation.
Less
More
- Posts: 305
- Thank you received: 92
09 Jul 2015 13:06 #205858
by fastbilly1
Replied by fastbilly1 on topic My Twilight Imperium board
That happens to everyone with a router - No matter the skill level. Atleast you recognized the issue before you started and not after it slipped and cut you...atleast when I did it it was a plunge router, so when I let go it sprung back up and did not gouge my arm too badly.Disgustipater wrote: Luckily I realized before starting that I needed to start from the center and spiral out so at least half of the router plate would still be touching the top surface.
Good thought, it does make a more professional looking final product aswell.Disgustipater wrote: That was my original plan, to use two pieces of 1/8", but they were bit warped and I was concerned about how flat it would lay once glued together. So I went with the single piece, which did warp a bit after I removed more than half the layers from the bulk of it, but it's minor enough to not be an issue.
Please Log in or Create an account to join the conversation.
Moderators: Gary Sax
Time to create page: 0.154 seconds